Scanning Procedure
Preparation
Observe the scanned objects: objects, creatures, size, color, material, deformation, etc;
Observe the scanning environment: dark, bright, narrow, dangerous, etc; 1
Quick Calibration first;
Click Scan, enter the scan interface
Select or create a new scanning mode. By default, there are 3 modes: Human Body Scanning Mode, Colorful Object Scanning Mode and LED Off Mode; 2
Set Resolution
The scanner is connected. If it is not, please check the diagnosis.
Start Scanning

How to turn off scan preview
Click the button on the scanner to enter the preview state where you can observe the software interface will appear as some “shadow” that is the scanner capturing some 3D point cloud data (
point cloud). It can help check whether the scanned object is easy to be scanned and whether the distance is appropriate through thepoint cloudsparse degree.
The reason for the sparse dot cloud may be: too close, or too far, you can observe the distance bar on the right to determine; whether the swept object is too bright, or too dark, too small, too transparent, you can spray developer to enhance.
The impact of too sparse point clouds: If you choose the ‘feature splicing’, situation like splicing failure, splicing errors, splicing non-fluency would occur.
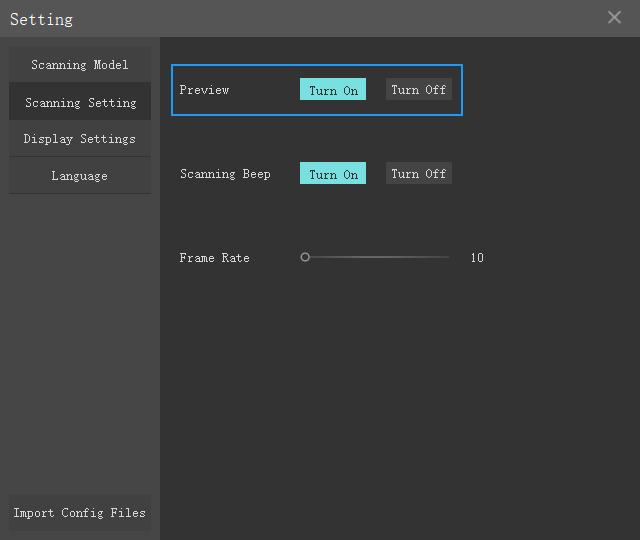
09:13If you get good at scanning and don’t like to preview every time, the preview function can be turned off in Settings as shown in the right figure.
Click the button on the scanner again to pause the preview, click again to officially start scanning, and complete the scan according to some scanning tips and scanning techniques.
Hint
When using the marker splicing, the process is different from the normal process. For details, see Marker Splicing .
After Scanning
When the scan is complete and no other operations are needed, you can either save the project as a scan in the menu bar so that you can continue scanning next time, or you can click the Finish button
 to perform a point cloud calculation, before which you can select a different resolution in the drop-down box on the right
  and then perform the point cloud calculation. After selecting the resolution, click the Data Quality Color Map button.
Point cloud prot-processing
Enter the point cloud processing interface after the calculation is completed: the upper toolbar can be done to remove isolated points
, non-connected items
and other operations, click the drop-down box next to the meshing
, select the way to fill the hole, whether to optimize the mesh, whether to simplify the mesh (recommended use), whether to mark points to fill the hole, whether to fill a small hole and then generate the mesh
.
In the Mesh interface:
In the Texture interface:
Texture processing: The upper toolbar can adjust the hue, luminance, saturation, ambient, and specula.
Hint
3 ways to fill holes
Not Close Holes: No hole filling, fast speed, suitable for importing the third software for processing
Close Small Holes: In the Human Scene, the model will have the edge extension but not in the Object Scene. Most of the holes will be filled.
Fully Close Holes: All holes will be filled. If some holes are too big, it will be ugly to use this function. The algorithm cannot achieve the hole-filling effect we imagined.
Saving Projects & Files
Based on the scanning procedure, we have 4 different projects, each of which represents a data type and an interface, respectively:
Data Type |
Interface |
Data Type To Be Saved |
|---|---|---|
Original Scanned Data |
Scan Interface |
Scan Project (.epj) |
Point Cloud Data |
Point Cloud Interface |
Point Cloud Project (.apj), Point Cloud file (.asc) |
Mesh Data |
Mesh Interface |
Mesh Project (.spj), Mesh File (.stl/.sk/.obj (monochrome model) /.ply) |
Mesh data with texture |
Texture Interface |
Mesh File (.stl/.sk/.obj (colorful object) /.ply) |
Error
Please do not use the Chinese name when saving an .obj files. Some third-party software may not support it, which may fail the maps to link automatically. At this time, we need to manually change some details in .mtl and .obj.


