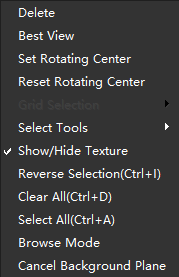
Right-click Menu
In the 3D window right-click menu is a tool we often use that can greatly help us to complete the scanning work faster. Now we will take you to know the specific functions of each command.

- Delete:
Shortcut key:
DelPurpose: During the scanning process and data processing, we often have to remove some redundant data in order to generate a cleaner model.
- Best View:
Function: Beginners will be a bit rusty when operating 3D models, and maybe you don’t know what to do next when the model is found outside the view. Right-click the best view to quickly place the model in the middle of the 3D window.
- Setting the Center of Rotation:
Function: Manually select a point to set the axis at which the rotation will take place.
- Resetting the Center of Rotation:
Function: Reposition the center of rotation in the original position.
- Grid Selection:
Selection of visible: selection of only the data of the triangles on the front side of the 3D window.
Select Through: All of them, including front back and hidden triangle data.
- Selector Tool:
Lasso Selection: Makes the selection tool act like a lasso to select irregular areas.
Rectangle selection: makes the shape of the user’s selection in the 3D window appear rectangular.
Discounted selection: Define the area of an irregular polygon by clicking on a finite number of points.
Ellipse selection: Makes the shape appear elliptical when the user selects it in the 3D window.
Circular selection: Makes the shape appear circular when the user selects it in the 3D window.
- Show/hide textures:
Shortcut key:
Ctrl+QFunction: When scanning and post-processing, you can show or hide the texture back and forth to see the model.
- Quick selection:
Invert selection: Selects those remaining unselected point clouds or triangle meshes.
Deselect all: Deselect all point clouds or triangle meshes.
Select all: Select all point clouds or triangle meshes.
- Browse Mode:
Function: Let the model rotate by itself to show, you can drag the model to adjust the rotation attitude at will.
- Background plane:
In Marker Splicing mode, after scanning markers, left-click on more than 4 markers and then create a background plane to automatically filter the background plane.